> ## Documentation Index
> Fetch the complete documentation index at: https://docs.formabledocs.com/llms.txt
> Use this file to discover all available pages before exploring further.
# Embedded templates
> Create templates in your product for use with the signing API. Upload a file, embed the editor, then send with a signature request.
Give your users the ability to upload documents and place signature fields directly in your product. Formable returns a short-lived `editUrl` that you load in an iframe — the same embedding pattern as [embedded signing](/walkthroughs/embedded-signing).
Templates you create here are what you pass to the [signing API](/walkthroughs/embedded-signing). After the user places fields and saves, reuse the `templateId` to create signature requests (ie let users sign the template).
This walkthrough covers uploading a file, embedding the template editor, placing fields, and regenerating an editor URL when it expires.
## Prerequisites
* A [developer account](https://docs.formabledocs.com/developer-account)
* An [API key](/authentication) from [Settings](https://app.formabledocs.com/settings)
* A PDF or Word document under 40MB
* Call the Formable API from your **backend** only
## Supported files
| Format | MIME type |
| ------ | ------------------------------------------------------------------------- |
| PDF | `application/pdf` |
| DOCX | `application/vnd.openxmlformats-officedocument.wordprocessingml.document` |
| DOC | `application/msword` |
Maximum size: **40MB**.
If you later use [redlining](/walkthroughs/redlining), the template needs a **DOCX** source file because redlining edits the underlying document.
## Overview
Send the file to Formable and receive a `templateId` plus an `editUrl`.
Load the `editUrl` in an iframe so users place fields in your product.
Pass the `templateId` into a [signature request](/walkthroughs/embedded-signing) (or a redline request) to collect signatures.
The embedded editor prepares the document. The [embedded signing](/walkthroughs/embedded-signing) walkthrough is how you send that same `templateId` for signature.
## Server side
### 1. Upload a template
Send the file as `multipart/form-data` with a `file` part and a `filename` field. Formable returns the `templateId` plus a ready-to-use editor URL.
```bash theme={null}
curl --request POST \
--url https://api.formabledocs.com/v1/templates \
--header "Authorization: Bearer $TOKEN" \
--form 'file=@./agreement.docx' \
--form 'filename=agreement.docx' \
--form 'signer_roles=[{"name":"Client","order":0}]'
```
```json Response theme={null}
{
"templateId": "abc123xyz",
"editTemplateAccess": {
"editUrl": "https://app.formabledocs.com/template-setup/abc123xyz",
"expiresAt": "2024-01-16T10:30:00.000Z"
}
}
```
Save the `templateId`. This is the ID you pass to the signing API when you [create a signature request](/walkthroughs/embedded-signing) (and when you create redline requests).
`signer_roles` is optional. Pass it as a JSON string in multipart form data when you want named roles (for example `Client`, `Witness`) before opening the editor. You'll assign those roles to required fields in the editor, then pass matching `signers[].role` values when creating a signature request.
Files over 40MB return `413`. Unsupported file types return `400` with `"Unsupported file type, only pdf, docx, and doc are supported"`.
### 2. Regenerate an editor URL
Editor URLs expire (by default one day after creation). Mint a fresh one when a user needs to edit the template again.
```bash theme={null}
curl --request POST \
--url https://api.formabledocs.com/v1/templates/abc123xyz/edit-url \
--header "Authorization: Bearer $TOKEN"
```
```json Response theme={null}
{
"editUrl": "https://app.formabledocs.com/template-setup/abc123xyz",
"expiresAt": "2024-01-16T10:30:00.000Z"
}
```
Generate the URL just before you show the editor. Pass only the URL to the client — never your API key.
You can only create an edit URL for templates owned by your organization. Other templates return `403`, and unknown IDs return `404`.
## Client side
Embed the `editUrl` in an iframe so users place fields without leaving your product.
```html theme={null}
```
Request the URL from your backend and pass it to the page just before rendering:
```javascript React theme={null}
function TemplateEditorFrame({ templateId }) {
const [editUrl, setEditUrl] = useState(null);
useEffect(() => {
fetch(`/api/formable/edit-url?templateId=${templateId}`)
.then((res) => res.json())
.then((data) => setEditUrl(data.editUrl));
}, [templateId]);
if (!editUrl) return Loading…
;
return (
);
}
```
```html Plain HTML theme={null}
```
### Listen for editor events
When the user saves in the embedded editor, Formable posts a message to the parent window. Listen for it to close the iframe or advance your UI:
```javascript theme={null}
window.addEventListener("message", (event) => {
if (event.origin !== "https://app.formabledocs.com") return;
if (!event.data || typeof event.data !== "object") return;
switch (event.data.type) {
case "onTemplateEditorSaved":
// Template saved — close the iframe or move to the next step
break;
case "onTemplateEditorError":
// Save failed to notify the parent — show an error or retry
break;
}
});
```
| Message `type` | When it fires |
| ----------------------- | ----------------------------------------------------------------- |
| `onTemplateEditorSaved` | The user successfully saved the template in the editor. |
| `onTemplateEditorError` | The editor could not deliver the save notification to the parent. |
Always check `event.origin` before handling a message. These events are for client UX only — they are not a substitute for verifying template state on your backend before sending.
## Place fields in the editor
In the embedded editor, use the **Field selector** to place and configure fields on the document.
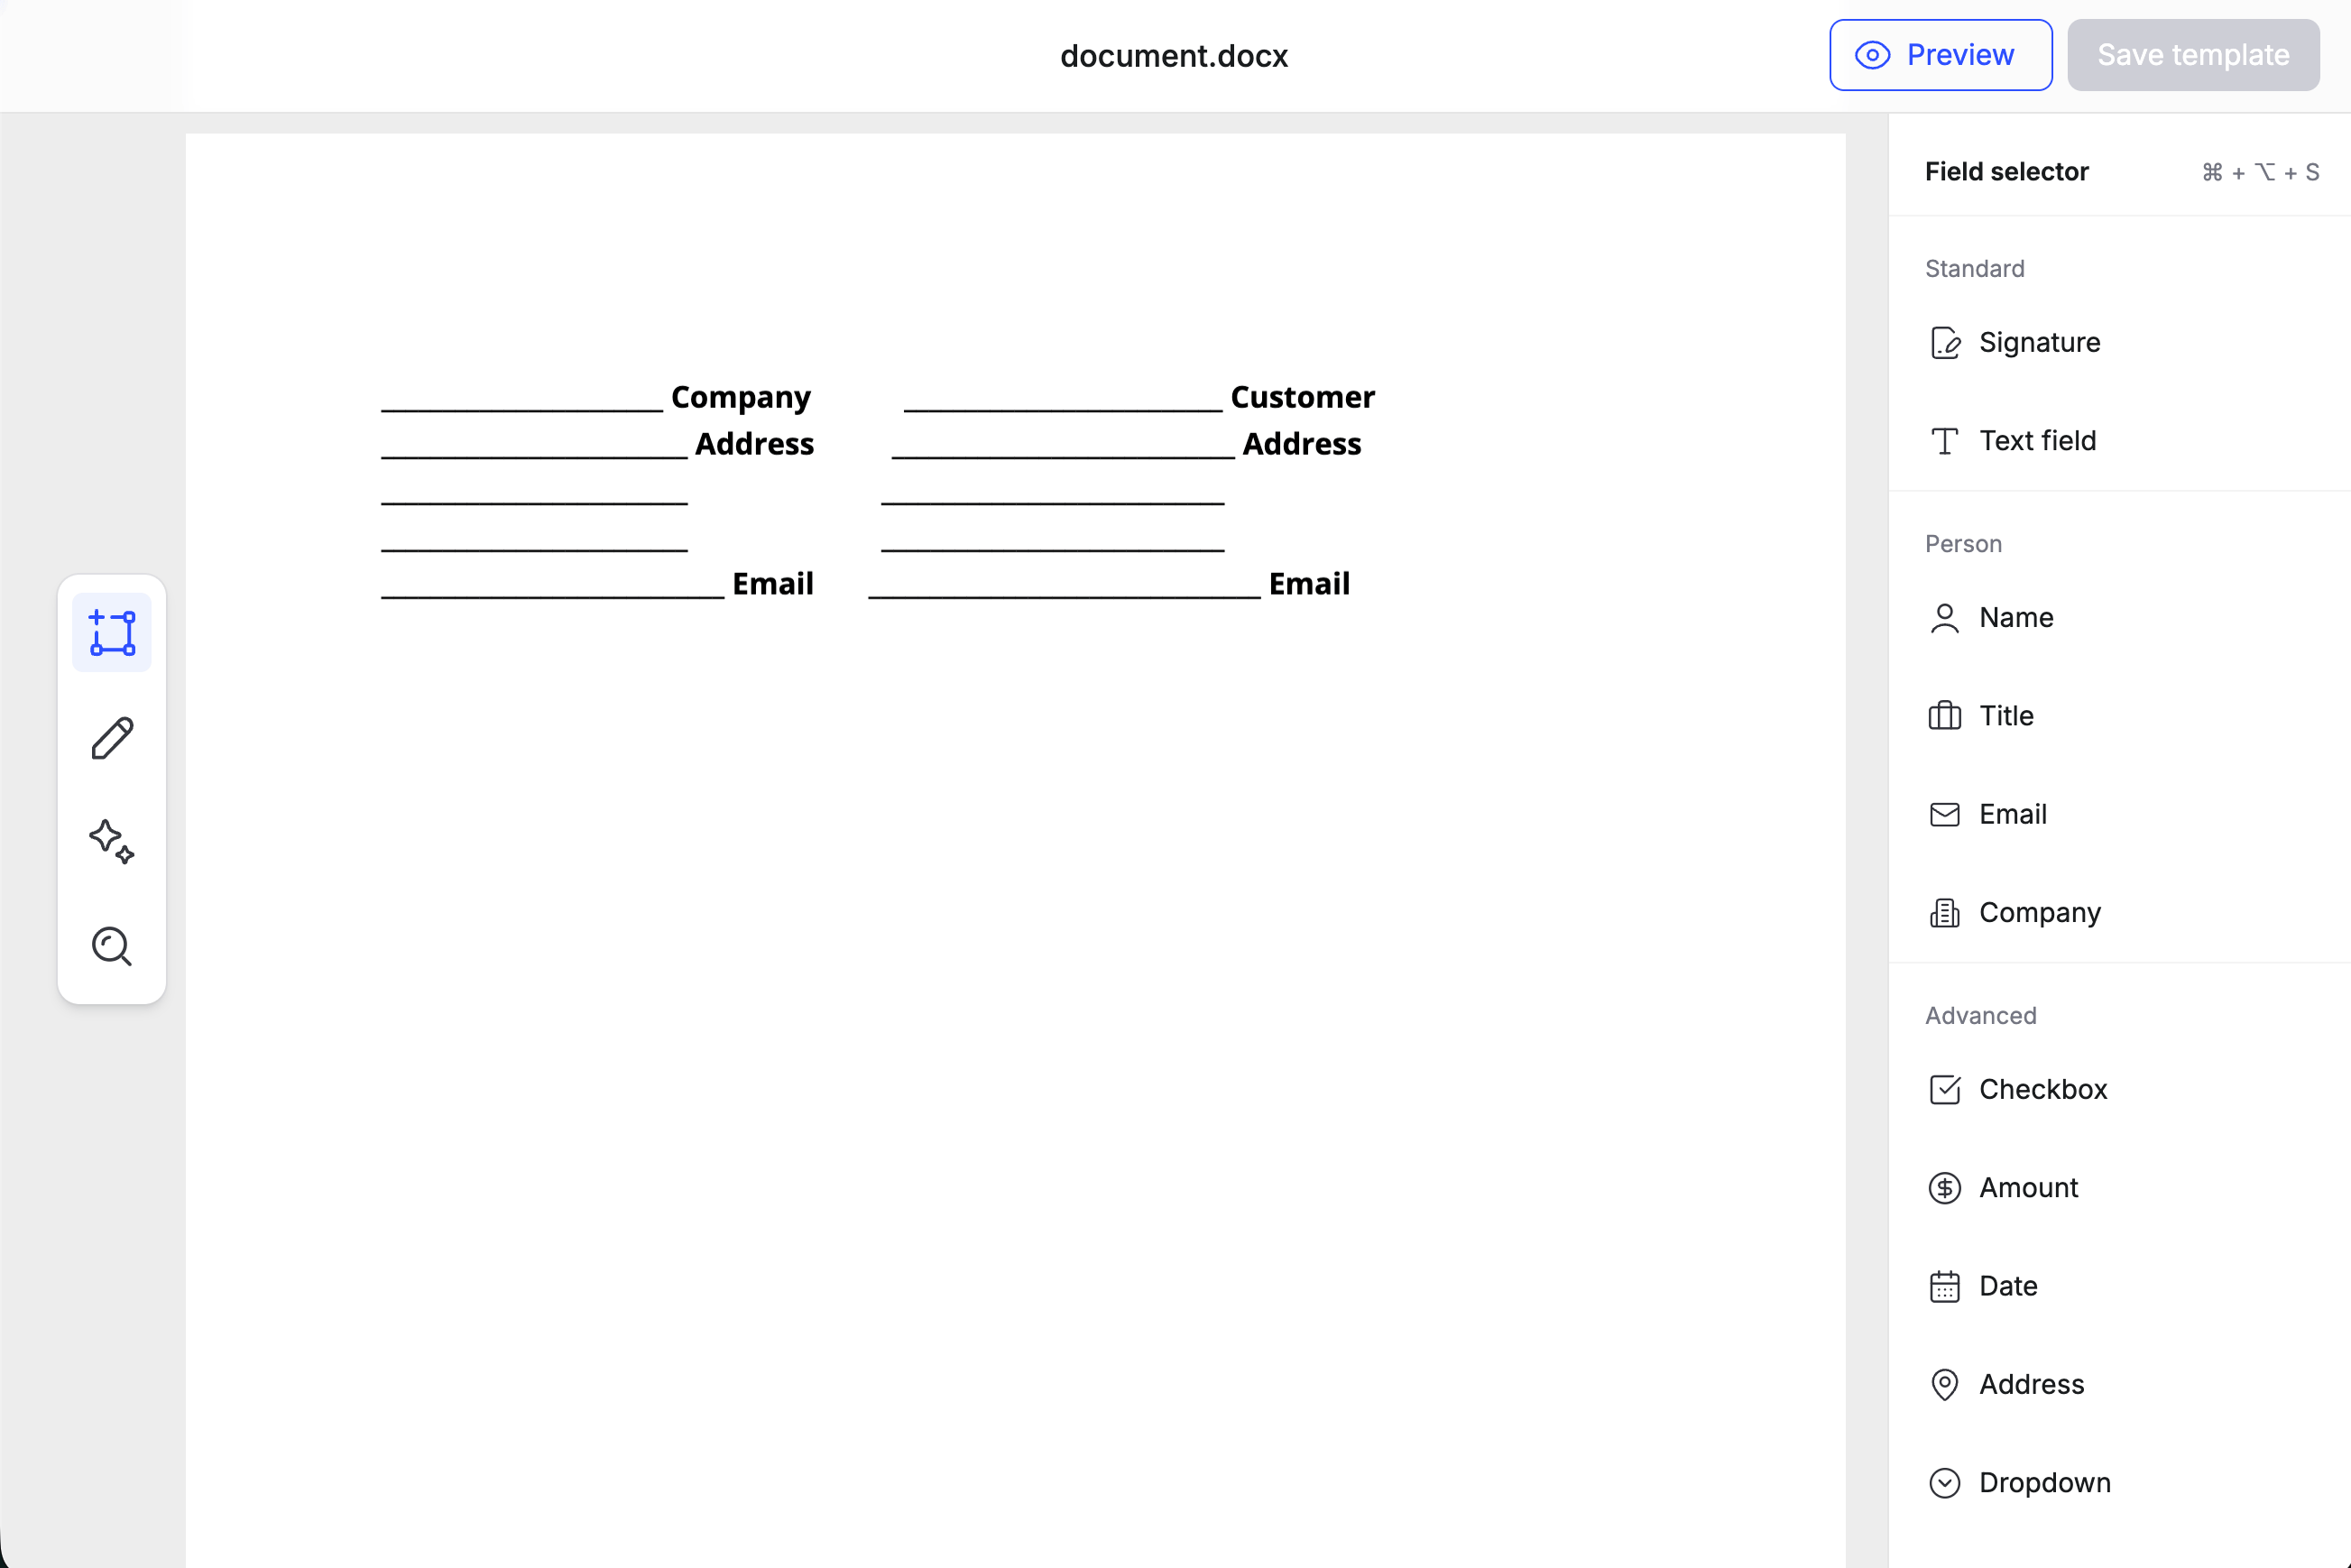 | Field | Use |
| ------------- | ---------------------- |
| **Signature** | Where the signer signs |
| **Text** | Free-form text input |
| **Date** | A date value |
| **Checkbox** | A boolean toggle |
| **Amount** | A monetary value |
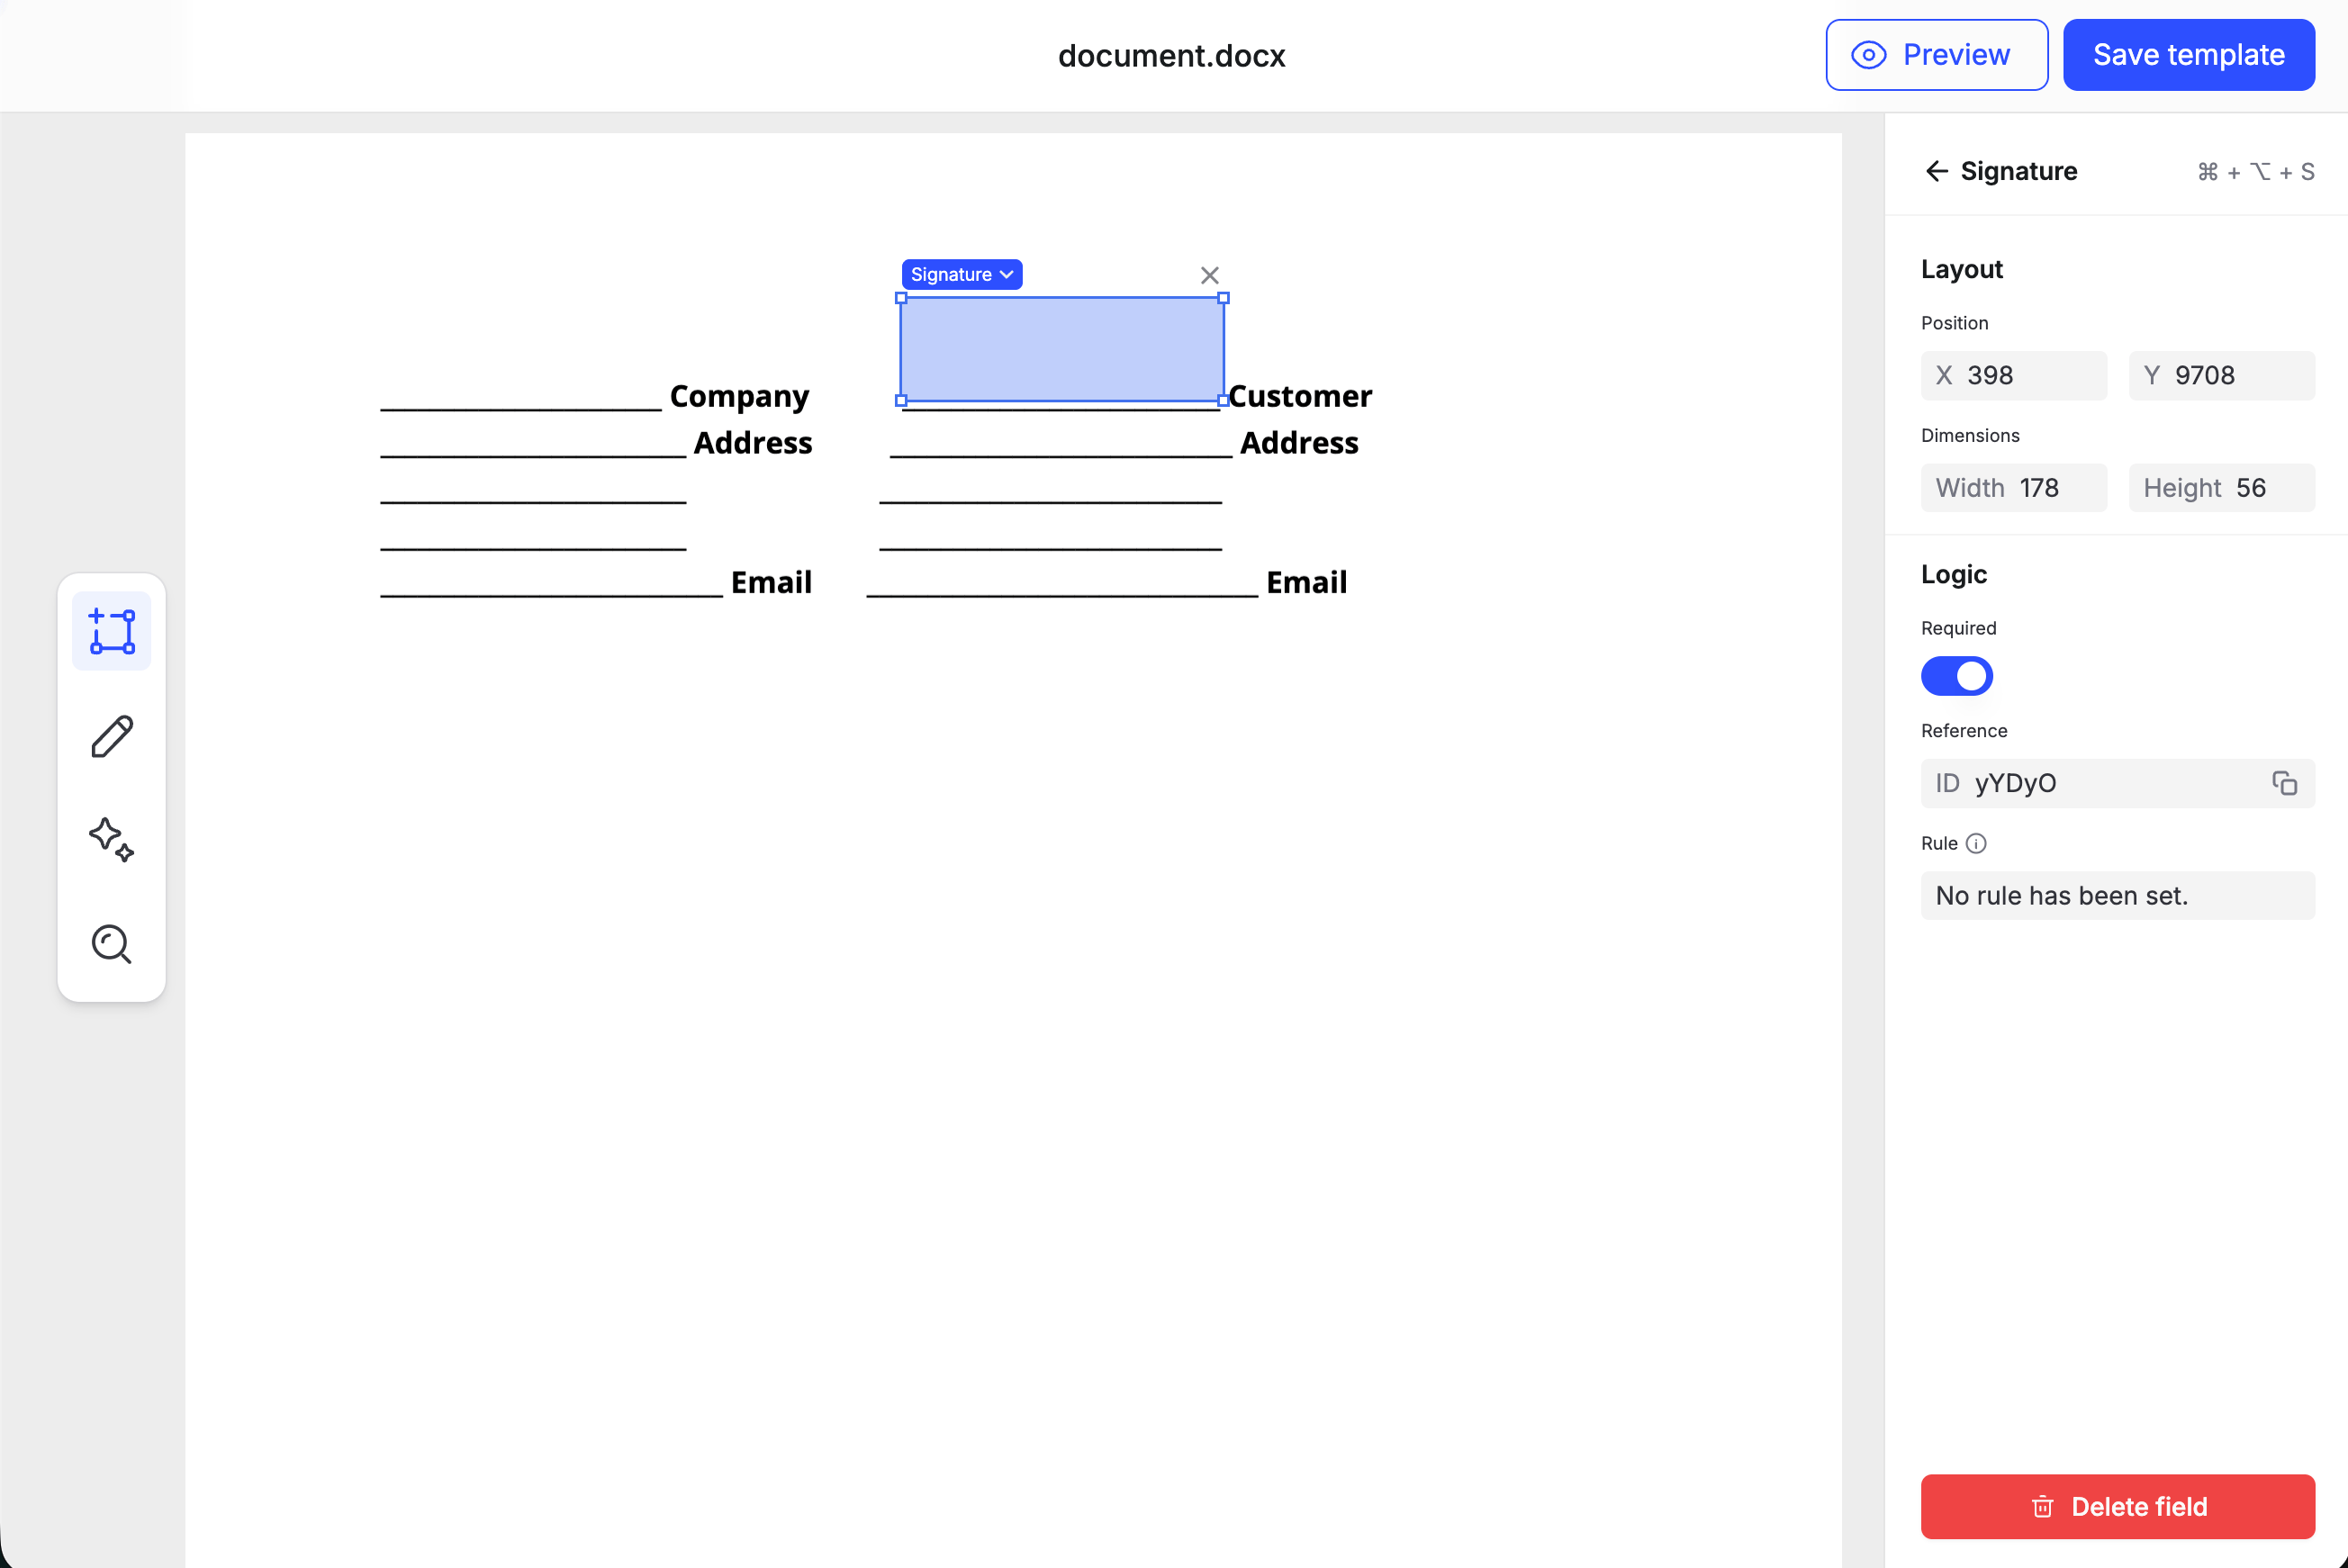
Select a placed field to set whether it's required, assign a **signer role**, and copy its **Reference ID**. Required fields must have a role before you can create a signature request. You can reference field IDs if you decide to [prefill fields](/walkthroughs/embedded-signing#prefill-fields) on a signature request.
| Field | Use |
| ------------- | ---------------------- |
| **Signature** | Where the signer signs |
| **Text** | Free-form text input |
| **Date** | A date value |
| **Checkbox** | A boolean toggle |
| **Amount** | A monetary value |
Select a placed field to set whether it's required, assign a **signer role**, and copy its **Reference ID**. Required fields must have a role before you can create a signature request. You can reference field IDs if you decide to [prefill fields](/walkthroughs/embedded-signing#prefill-fields) on a signature request.
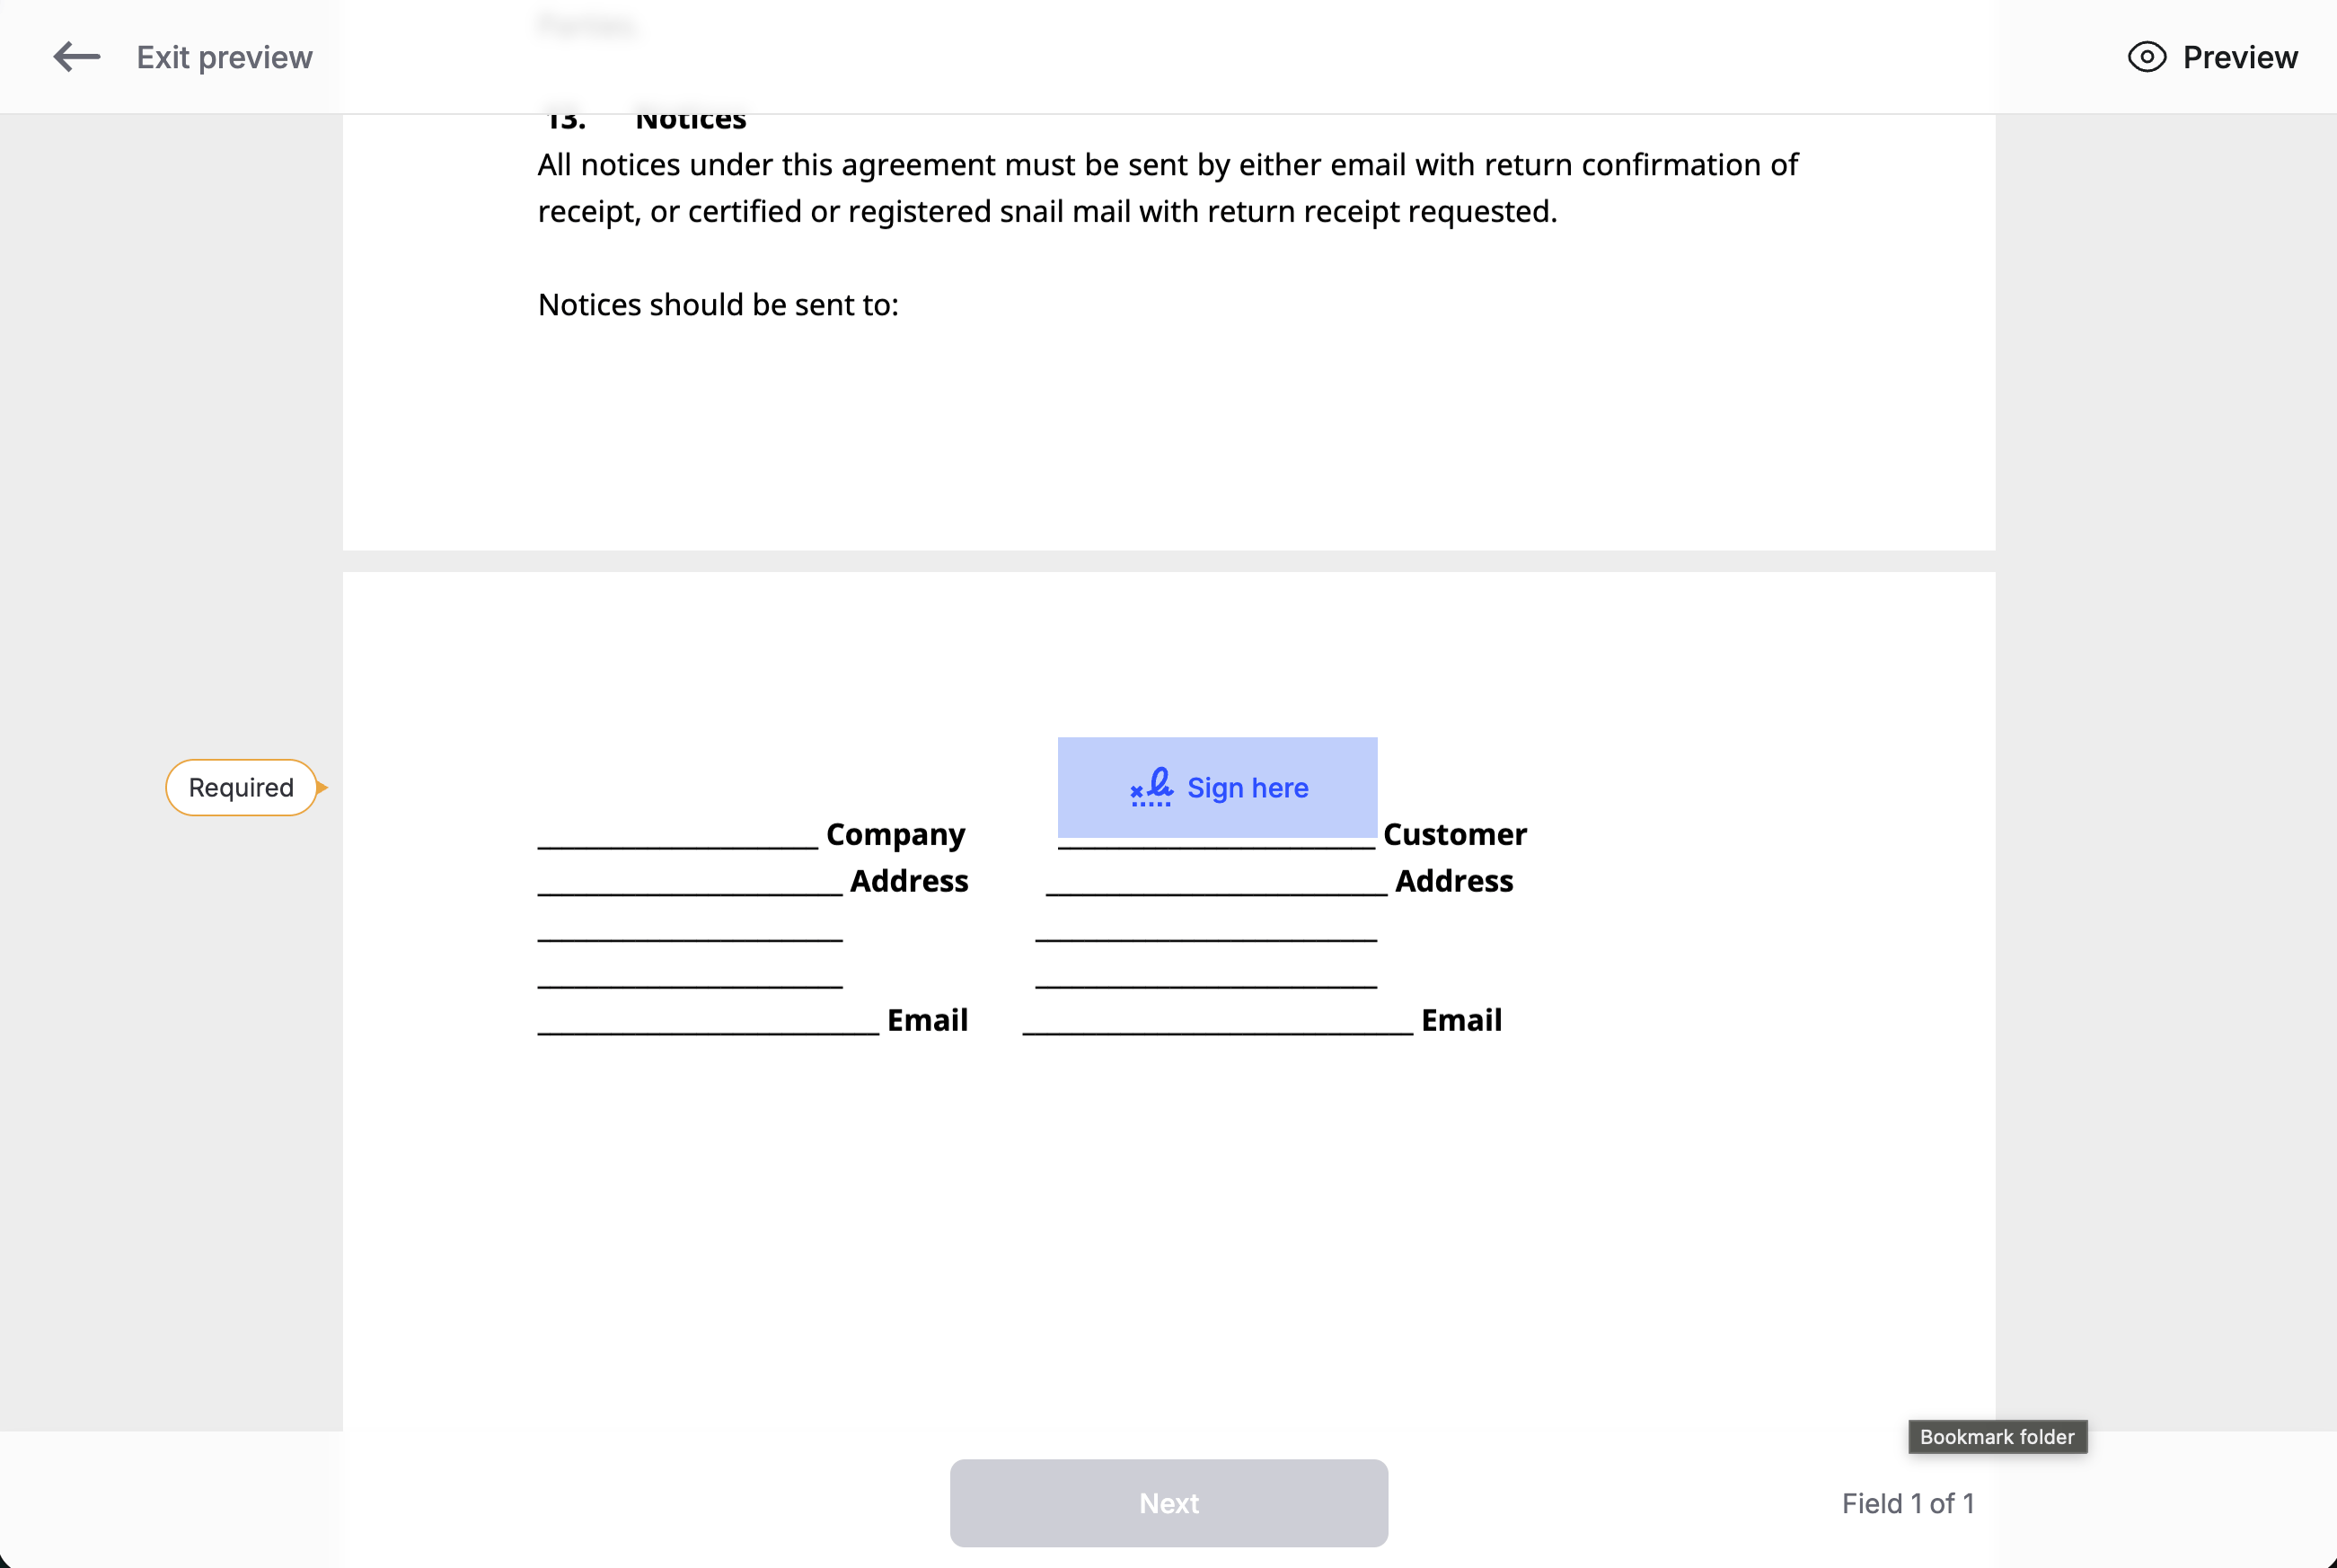
 (Optional) Click **Preview** to walk through the document as a signer would see it, including required fields.
 When you're done, click **Save template**. The editor posts `onTemplateEditorSaved` to the parent window, which you can process to close the iframe.
## Next steps
Your template is ready for the signing API. Pass the `templateId` from this walkthrough into a signature request to collect signatures.
Use this template with the signing API — create a signature request and embed the signing experience.
Negotiate revisions on a DOCX template before signing.
When you're done, click **Save template**. The editor posts `onTemplateEditorSaved` to the parent window, which you can process to close the iframe.
## Next steps
Your template is ready for the signing API. Pass the `templateId` from this walkthrough into a signature request to collect signatures.
Use this template with the signing API — create a signature request and embed the signing experience.
Negotiate revisions on a DOCX template before signing.